Synopsis
The vital significance of radon mitigation for homeowners in St. Louis and the surrounding areas is described in this blog post from Air Sense Environmental in Edwardville, Illinois. One of the main causes of lung cancer in nonsmokers is radon, a radioactive gas that enters dwellings from the ground. Many residents remain unaware of the dangers, making proactive testing and mitigation essential. The blog provides a step-by-step guide to radon mitigation, covering testing, choosing a professional, site inspection, system installation, post-mitigation testing, and ongoing maintenance. It also breaks down the cost factors involved in radon mitigation and emphasizes the importance of maintaining long-term air quality for a safer home environment.
Key Takeaways
- Radon is a major health risk – The EPA identifies it as the second leading cause of lung cancer among nonsmokers.
- Testing is the main step – Homeowners should conduct short-term or long-term radon tests to assess their risk.
- Professional mitigation is necessary for high levels – If radon levels exceed 4.0 pCi/L, mitigation is required to make sure safety.
- A structured mitigation process – From inspection to installation, professionals design and implement customized solutions.
- Ongoing monitoring is vital – Homeowners should retest and maintain their mitigation system for long-term effectiveness.
- Costs vary – Factors like home size, soil type, and system complexity impact mitigation expenses, typically ranging from $800 to $2,500.
- Air Sense Environmental offers expert solutions – Homeowners can rely on their expertise for transparent pricing and effective radon reduction.
At Air Sense Environmental, we understand that many homeowners in St. Louis face an invisible threat in the form of radon gas. Silently leaking into our homes from the ground, this radioactive material poses a major risk to our health and is one of the main causes of lung cancer among nonsmokers. Regretfully, many locals are still ignorant of the risks presented by radon and how critical it is to take steps to lower exposure levels. Our goal is to confront this problem head-on by offering homeowners concrete actions they can take to protect their families, in addition to simply outlining the facts.
Our commitment lies in making radon remediation accessible and understandable for everyone. We believe in empowering homeowners with the knowledge necessary to make ideal decisions about their indoor air quality. Our team is dedicated to guiding residents through each stage of the radon mitigation process, from testing to installation. We offer reliable services that cater specifically to our community’s needs, coupled with transparent pricing for radon mitigation systems. Our goal is to build lasting relationships with our clients by contributing to healthier living environments in St. Louis. By prioritizing proactive measures against radon exposure, we can work together to secure safer homes for our families.
What Is Radon and Why Mitigate It?
Radon is a naturally occurring radioactive gas produced by the decay of uranium in soil, rock, and water. It can seep into homes through cracks in floors, foundations, and walls, as well as through gaps in construction joints and around service pipes. Because radon is colorless, odorless, and tasteless, it goes unnoticed without proper testing, making it a silent threat to indoor health.
Long-term exposure to elevated levels of radon can have serious health implications. Many residents may not realize that the Environmental Protection Agency (EPA) identifies radon as the second leading cause of lung cancer among nonsmokers, contributing to thousands of preventable deaths each year. Even at lower levels, prolonged exposure can still pose significant health risks. Therefore, homeowners must take an active role in identifying the presence of radon in their living environments.
Radon mitigation systems effectively reduce radon levels to safe thresholds, helping to protect families from the potential dangers associated with this gas. The process not only makes homes safer but also provides peacefulness for residents. By implementing radon remediation measures, homeowners can lower indoor radon concentrations and create a healthier living space. Taking preventive measures to address radon exposure is essential for safeguarding both your health and the well-being of your loved ones.
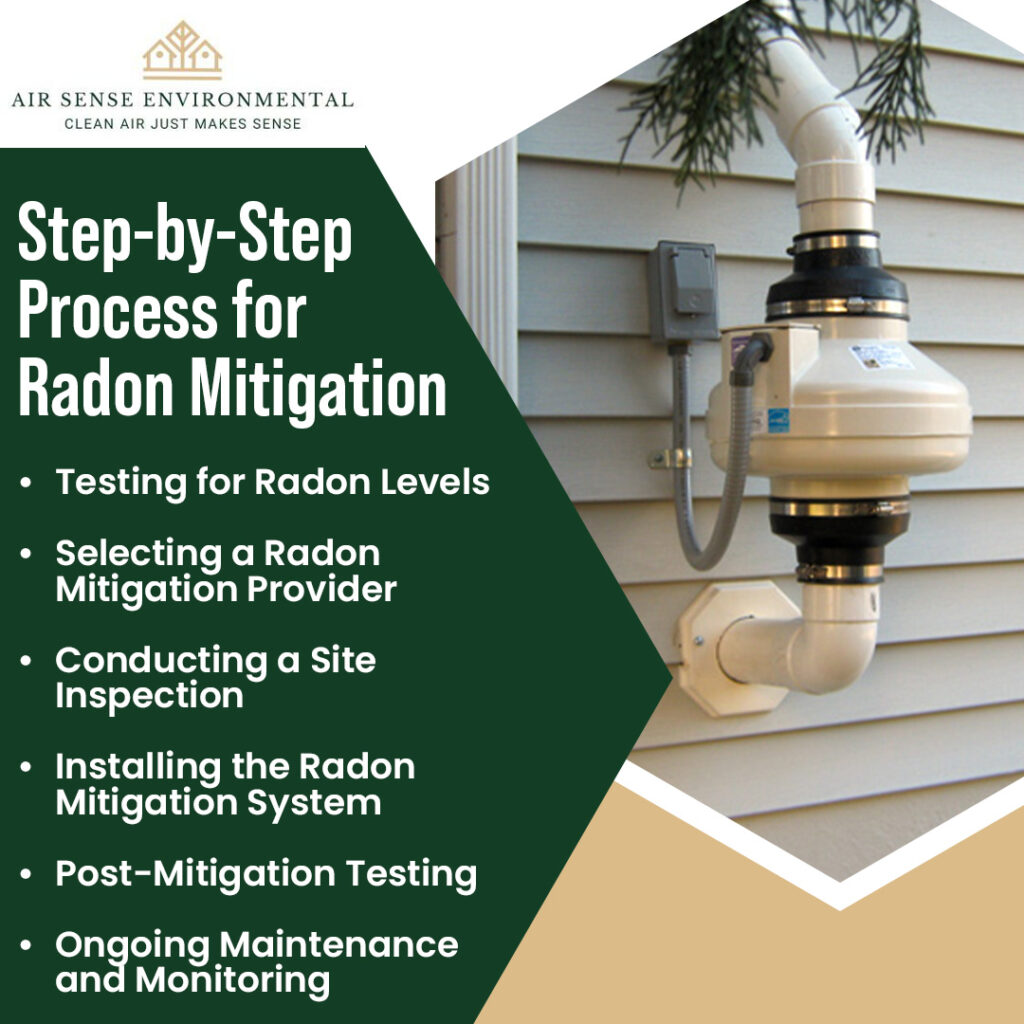
Step 1: Testing for Radon
Testing your home for radon is the necessary initial step in the mitigation process. It’s a straightforward and vital procedure that can be conducted with a certified radon-testing kit. You have two primary testing methods to choose from:
- Short-term tests: Short-term tests last anywhere from 2 to 90 days. These are useful for obtaining a quick snapshot of radon levels in your home, making them ideal for initial assessments.
- Long-term tests: Long-term tests are conducted over periods exceeding 90 days. They provide a more thorough average of radon levels, allowing for a better comprehension of year-round exposure.
If testing reveals radon levels at or above 4.0 picocuries per liter (pCi/L), moving forward with mitigation becomes necessary to protect your household.
Step 2: Choosing a Qualified Mitigation Professional
Once you confirm elevated radon levels, your next step is to choose a qualified professional for the mitigation process. Hiring a competent service provider who adheres to state regulations and industry best practices is vital for effective radon reduction.
Look for professionals with credentials and hands-on experience specific to radon remediation. At Air Sense Environmental, we emphasize the importance of thorough training for our team, allowing us to effectively implement radon mitigation services in St. Louis using established and reliable methods.
Step 3: Site Inspection
Upon selecting a mitigation professional, they will conduct a thorough site evaluation of your home. This process is essential for determining the most effective mitigation strategy and includes the following key components:
- Checking ventilation system designs: Analyzing current systems can inform how radon flows in and out of your home.
- Identifying entry points for radon gas: It’s important to pinpoint all potential entry points so that mitigation strategies can address these vulnerabilities.
- Evaluating your basement or crawl space: These areas are common accumulation spots for radon, making them a focal point in the evaluation.
A detailed site analysis will ultimately guide the selection of the best mitigation system for your home.
Step 4: Designing the Mitigation System
Following the site evaluation, the professionals will develop a tailored mitigation system to meet your home’s specific requirements. The proposed design may include one or a combination of the following strategies:
- Sub-slab depressurization: This widely used method involves installing a fan that draws radon from beneath the home and vents it safely outside.
- Active soil depressurization: Similar to sub-slab depressurization, this technique creates a vacuum beneath the house to reduce radon entry.
- Drainage systems: In some cases, installing drainage systems may be necessary to mitigate the risk of radon effectively.
The design phase focuses on balancing the system’s efficiency with cost-effectiveness, ensuring a solution that works for your home and budget.
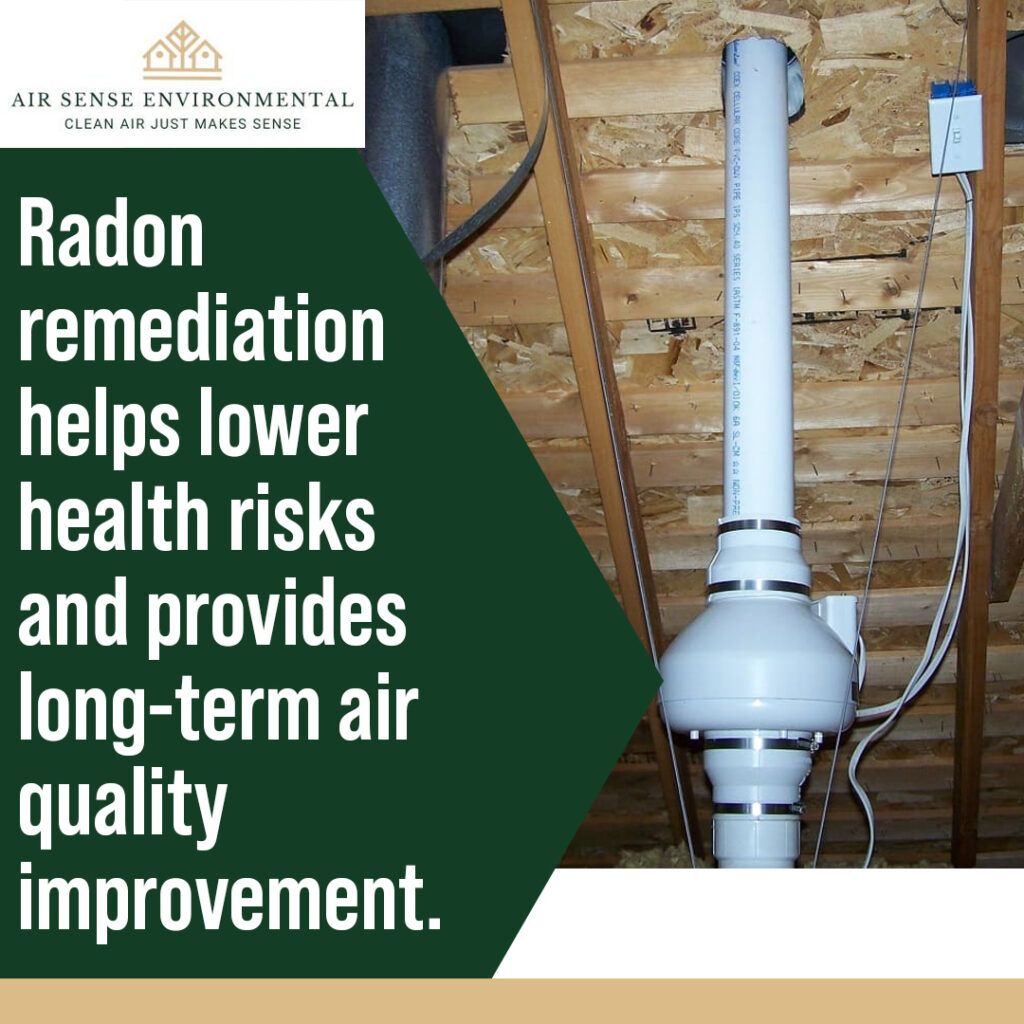
Step 5: Installation
The next phase is the installation of the mitigation system. The process typically takes several hours, although the duration may vary based on the complexity involved. During installation, you can expect several activities:
- Installation of pipes: These pipes will direct radon gas from beneath your home to the outdoor atmosphere, keeping it away from your living space.
- Sealing cracks and openings: Professionals will identify and seal any entry points to substantially decrease the potential for radon infiltration.
- Installation of a fan: If applicable, a fan will work continuously to draw the radon from below, ensuring a consistent flow of air and reducing risk.
After installation, the system is designed for minimal maintenance, allowing you peacefulness with long-term protection.
Step 6: Testing Post-Mitigation
Once the mitigation system is installed, scheduling a follow-up radon test is essential. This step verifies that the mitigation measures are working effectively and that indoor radon levels have decreased. Ideally, this retesting should occur within 30 days following installation.
Post-mitigation testing should confirm radon levels below the EPA action level of 4.0 pCi/L, assuring you that your home has been made safer for you and your family. Regular monitoring will help maintain low radon levels in the long run.
Step 7: Regular Maintenance and Monitoring
After the mitigation system is up and running, it’s vital to perform regular maintenance. This includes:
- Monitoring the system: Check for any alerts or signs that indicate reduced efficiency.
- Routine inspections: Schedule annual inspections to ascertain the system is functioning properly.
- Retesting: Conduct periodic radon tests every two years or if you make significant changes to your home.
Regular maintenance helps maintain low radon levels in the long term.
Costs of Radon Mitigation Systems
In terms of installing a radon mitigation system, costs can fluctuate considerably based on several key factors. Generally, the cost should range from $800 to $2,500. This wide range reflects the specific circumstances of each home and the necessary work involved to lower radon levels effectively.
Here are the primary factors that can influence the overall cost of a radon mitigation system:
- Home Size: Larger homes typically require more extensive systems to manage radon levels effectively. This can increase both material and labor costs.
- Soil Type: The type of soil on which your home is built can complicate the installation process. Rocky or filled ground may require additional effort and specialized equipment, which can lead to higher costs.
- System Type: Different mitigation methods come with varying price points. Some systems may be more complex to install than others, impacting the final cost of the project.
At Air Sense Environmental, we aim to provide clear and transparent pricing options so that homeowners can fully understand the financial aspects of radon mitigation. We believe in making the process as straightforward and stress-free as possible, ensuring that you receive the best value for your investment in a safer home. Additionally, we are committed to delivering all-inclusive solutions that fit your specific needs, making it easier for you to take proactive steps toward maintaining a healthy indoor environment.
Contact Us
For more information or to schedule a radon testing appointment, please reach out to us at:
Phone: (618) 593-4815
Email: [email protected]
Taking the Next Steps for a Safer Home
One of the most important steps in preserving good indoor air quality is radon mitigation. These guidelines can help you and our experts work together to lower the radon levels in your house. It is an investment in the health and safety of your family to take action against exposure to radon.
If you are a resident of St. Louis or the surrounding area and need radon testing or mitigation services, do not hesitate to reach out to Air Sense Environmental in Edwardville, IL, for guidance and assistance. Together, we can work towards a safer indoor living environment, protecting your loved ones from the dangers of radon exposure.